| 知乎专栏 |
目录
Openfiler is a powerful, intuitive browser-based network storage software distribution. Openfiler delivers file-based Network Attached Storage and block-based Storage Area Networking in a single framework.
openfiler 的官方网站
过程 66.1. Openfiler Storage Control Center
登录管理界面
https://<ip address>:446/
初始帐号和密码是: openfiler/password
首先要修改默认密码
Accounts->Admin Password
Current Password:passwordNew Password:新密码Confirm New Password:确认密码
Submit 提交
用户认证
openfiler.ldif
dn: ou=people,dc=bg7nyt,dc=cn
ou: people
objectClass: organizationalUnit

dn: ou=Idmap,dc=bg7nyt,dc=cn
ou: Idmap
objectClass: organizationalUnit
添加people组织单元
[chenjingfeng@backup ldap]$ ldapadd -x -D "cn=root,dc=bg7nyt,dc=cn" -W -f openfiler.ldif
Enter LDAP Password:
adding new entry "ou=people,dc=bg7nyt,dc=cn"

adding new entry "ou=Idmap,dc=bg7nyt,dc=cn"
Accounts->Authentication
Use LDAP: 打勾
Server:ldap.bg7nyt.cnBase DN:dc=bg7nyt,dc=cnRoot bind DN:cn=root,dc=bg7nyt,dc=cnRoot bind Password:你的密码
Services->LDAP Settings
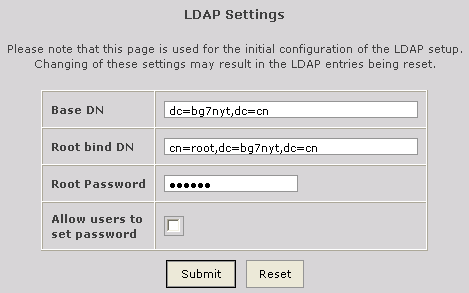
Base DN:dc=bg7nyt,dc=cnRoot bind DN:cn=root,dc=bg7nyt,dc=cnRoot Password:你的密码
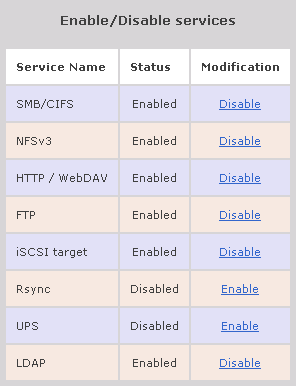
Services->Enable/Disable
Accounts->Account Administration
Group Administration
Group Name:nfs
User Administration
Username:用户名Password:密码Retype password:确认密码Primary Group:用户组
查看组织单元:ou=people,dc=bg7nyt,dc=cn
[chenjingfeng@backup ldap]$ ldapsearch -x -b 'ou=people,dc=bg7nyt,dc=cn'
# extended LDIF
#
# LDAPv3
# base <ou=people,dc=bg7nyt,dc=cn> with scope sub
# filter: (objectclass=*)
# requesting: ALL
#

# people, bg7nyt.cn
dn: ou=people,dc=bg7nyt,dc=cn
ou: people
objectClass: organizationalUnit

# neo, People, bg7nyt.cn
dn: uid=neo,ou=People,dc=bg7nyt,dc=cn
objectClass: inetOrgPerson
objectClass: posixAccount
homeDirectory: /dev/null
loginShell: /bin/false
cn: neo
givenName: neo
sn: neo
uid: neo
uidNumber: 500
gidNumber: 500

# search result
search: 2
result: 0 Success

# numResponses: 3
# numEntries: 2
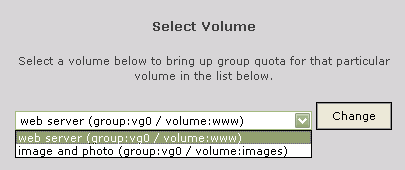
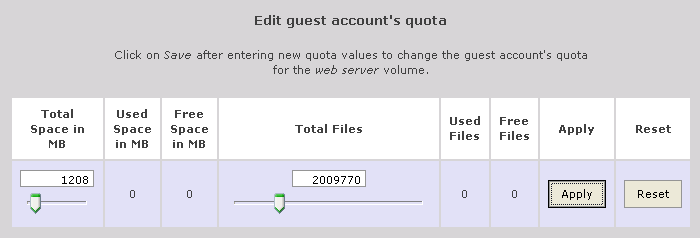
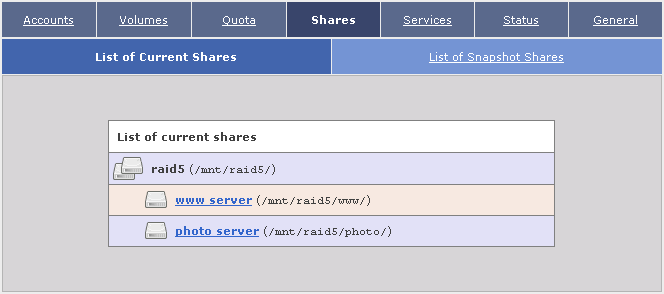
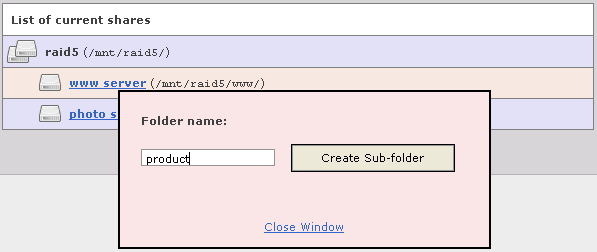
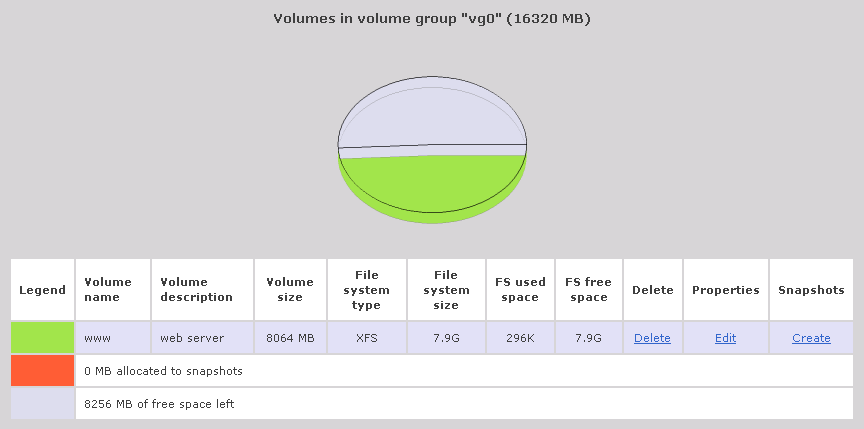
卷管理 [Volumes]
我这里是使用VMware做的试验,在VMware中增加一些硬盘即可.
Volumes -> Physical Storage Mgmt.
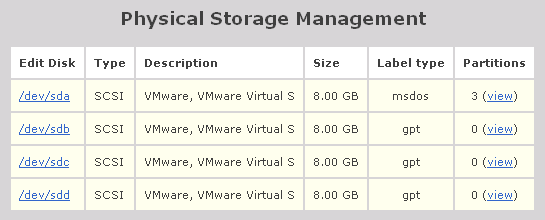
Edit Disk Type Description Size Label type Partitions
/dev/sda SCSI VMware, VMware Virtual S 8.00 GB msdos 3 (view)
/dev/sdb SCSI VMware, VMware Virtual S 8.00 GB gpt 0 (view)
/dev/sdc SCSI VMware, VMware Virtual S 8.00 GB gpt 0 (view)
/dev/sdd SCSI VMware, VMware Virtual S 8.00 GB gpt 0 (view)
...
openfiler安装在/dev/sda,/dev/sda硬盘空间不用太大,单独给openfiler使用.建议做RAID 1(硬件RAID卡或服务器主版提供的RAID)
其它硬盘是用于存储的硬盘,如果有条件这些硬盘组也最好做成硬RAID,没有条件我们可以在openfiler中做软件RAID.
点击"Edit Disk"列表内硬盘标签,之后可以看到"Create a partition in /dev/sdb"
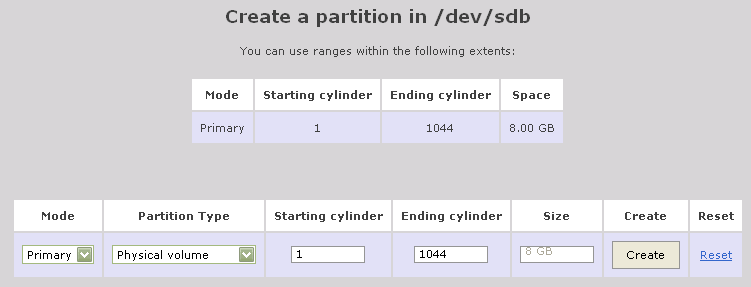
Mode:PrimaryPartition Type:[Physical volume]/ [RAID array member]Starting cylinder:1Ending cylinder Size:1044Size:自动产生
单击"Create"创建分区
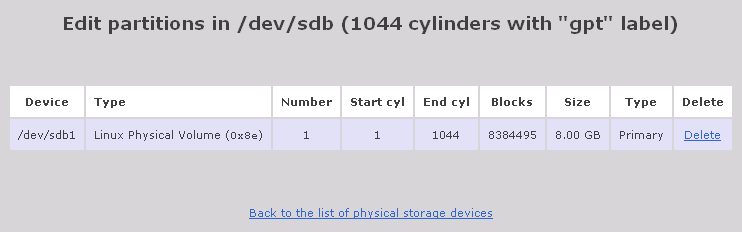
Back to the list of physical storage devices
如果没有特别需求,不需要创建多个分区.
Edit partitions in /dev/sdb (1044 cylinders with "gpt" label)

Device Type Number Start cyl End cyl Blocks Size Type Delete
/dev/sdb1 Linux Physical Volume (0x8e) 1 1 10 78831 76.98 MB Primary Delete
/dev/sdb2 Linux Physical Volume (0x8e) 2 10 100 721920 705.00 MB Primary Delete
/dev/sdb3 Linux Physical Volume (0x8e) 3 100 200 801792 783.00 MB Primary Delete
/dev/sdb4 Linux Physical Volume (0x8e) 4 200 300 802816 784.00 MB Primary Delete
/dev/sdb5 Linux Physical Volume (0x8e) 5 300 400 801792 783.00 MB Primary Delete
Volumes->Volume Group Mgmt.
Volume Group 可以实现动态扩展空间,注意如果在使用中有一个成员盘损坏,你将无法恢复数据.
应急使用可以,不建议长期使用.
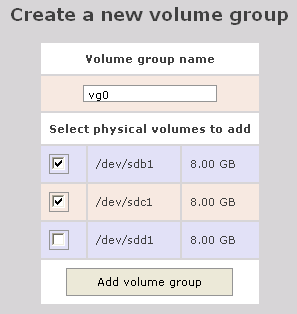
Volume group name:vg0Select physical volumes to add:在列表前面打勾/dev/sdb1 8.00 GB /dev/sdc1 8.00 GB
单击"Add volume group"创建vg0

表 66.1. Volume Group Management
| Volume Group Name | Size | Allocated | Free | Members | Add physical storage | Delete VG |
|---|---|---|---|---|---|---|
| vg0 | 15.94 GB | 0 bytes | 15.94 GB | View member | PVs Add | PVs Delete |
扩展Volume Group单击[PVs Add]按钮
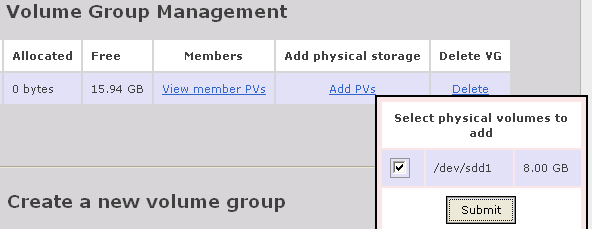
分区列表前面打勾
[Submit]提交
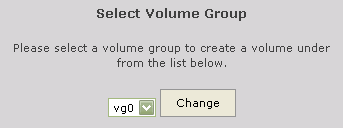
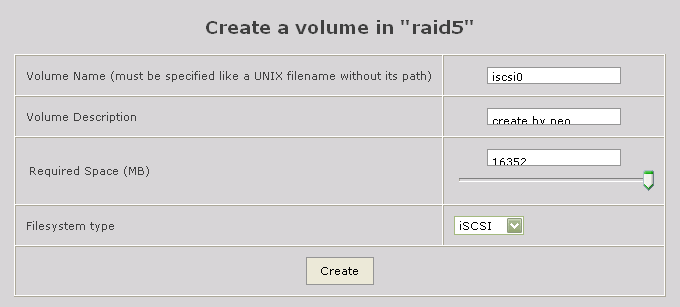
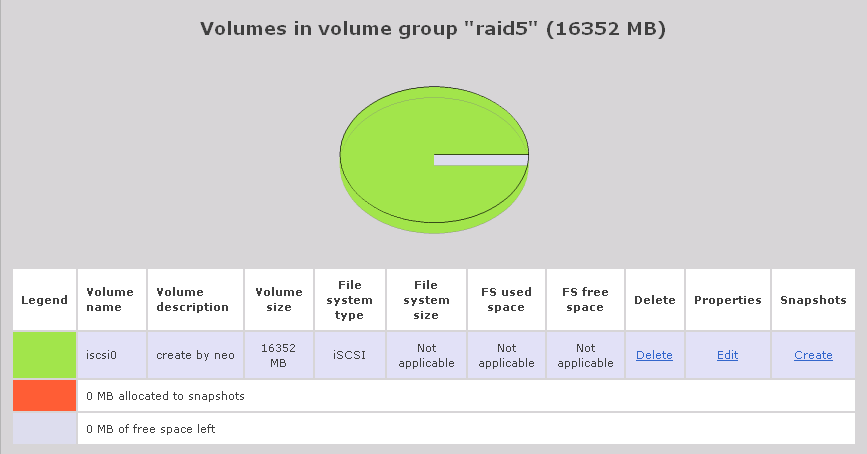
Volumes -> Create New Volume
选择VG
创建卷
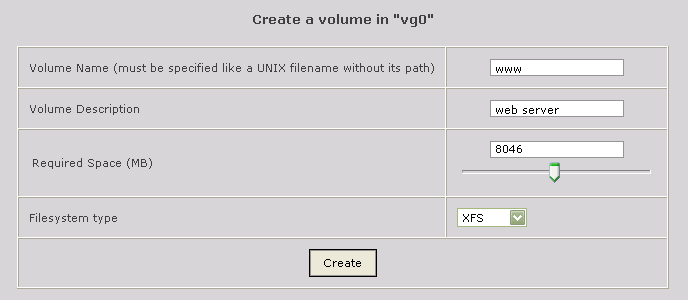
Volume Name:卷名Volume Description:描述Required Space (MB):配额Filesystem type:文件系统
单击[Create]按钮
Openfiler提供软RAID.
Volumes -> Physical Storage Mgmt.
点击"Edit Disk"列表内硬盘标签,之后可以看到"Create a partition in /dev/sdb"
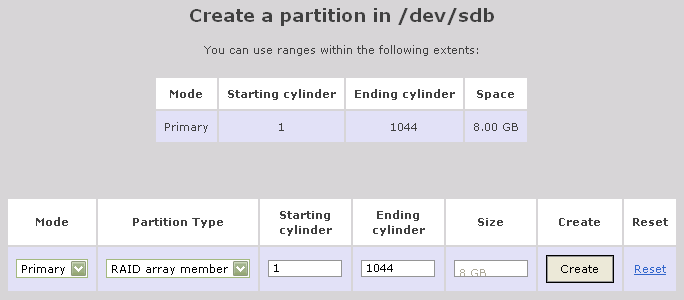
单击[Create]按钮创建RAID组成员
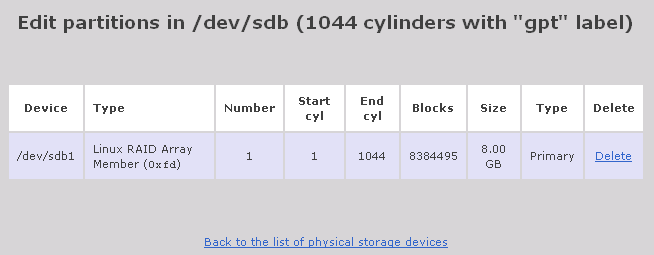
单击[Back to the list of physical storage devices]返回到 "Physical Storage Management"
Volumes -> Software RAID Mgmt.
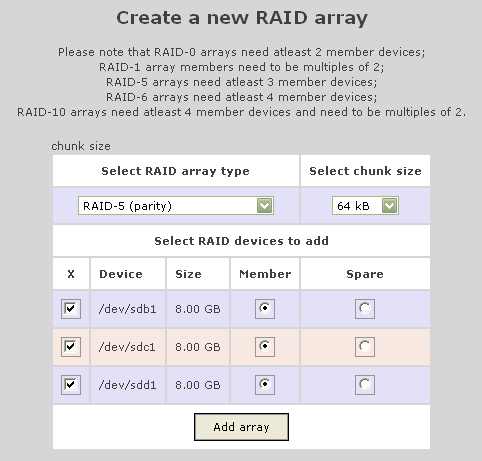
Select RAID array type:RAID(0,1,5,6,10)Select chunk size:这可以针对你的需求做优化Select RAID devices to add:打勾选择
单击[Add array]创建RAID
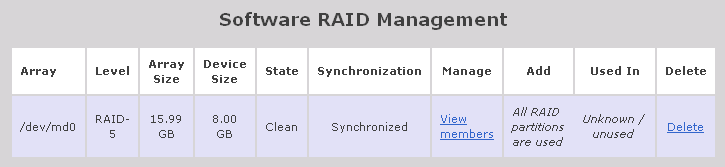
RAID创建完成后,就可以卷组和卷
Volumes -> Volume Group Mgmt. -> Create New Volume
RAID 6 采用双校验盘最少4块硬盘
Volumes -> Create New Volume
单击[Create]按钮
单击[Update]按钮
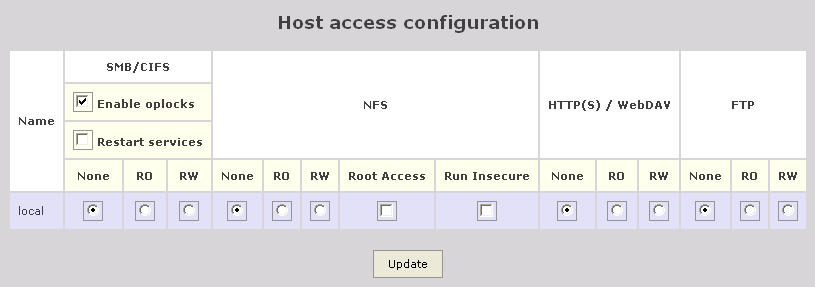
Services -> Enable/Disable -> iSCSI target 确认已经 Enable
General -> Local Networks
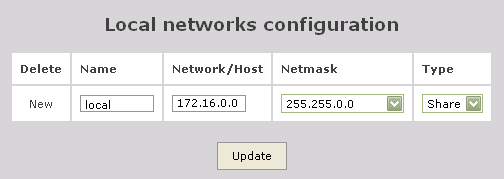
单击[Update]按钮
Volumes -> List of Existing Volumes -> Select Volume Group
单击 iScsi 卷列表 Properties 下的 [Edit] 连接
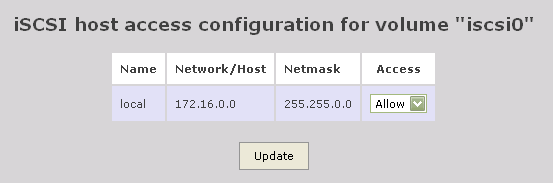
默认是:Deny, 修为Allow


![[注意]](/graphics/note.png)